Showing posts with label hounds tooth. Show all posts

Saturday, June 28, 2014

Luscious Hounds Tooth

  I really love the way this hounds tooth turned out!

   
I tried something new to try to make my weaving better.  I wound a towel onto the beam as the warp first wound on. I have noticed that my weaving often ends up with a U-shape because the nylon cords change the shape of the weave once it hits that area.  This towel really worked wonders!  I like how square my weaving ends up being.


On this warp I also made the edges different colors.  One side has black and one side has white.  Usually I make them both the same.  The reason why I did it differently this time though was because I ran the black yarn up the black side and the white yarn up the white side.  It really made it look better, not be too bulky, and not be too bright by having the opposite color.  I'll have to remember this for next time.


Time to wash.


Next time I'll cut and serge, and sew the edges!

Tuesday, June 24, 2014

Smaller is better

 Sometimes I feel like an evil scientist trying out my experiments!


Or a magician during a magic show... doing tricks!  "And now, for my next trick..."


I am really loving this 2/2 hounds tooth twill.  This current project is a 3 yard warp and it's made of 8/2 cotton from WEBS.  I'm having so much fun with it that I'm almost sorry I didn't discover this weave sooner!  I'm not even sure why it took me so long to try it, I think I just assumed it wouldn't be as good.  Yes, the hounds tooth design is smaller, but sometimes smaller is better!  It definitely has a good feel to the fabric being only 2/2.  The floats are only as long as 2 threads, but in the 8-shaft hounds tooth, the stretches are 4 threads long, and sometimes that is just too much space.  This cloth will certainly hold together well.  I should try redoing this design using something thick, like the worsted weight peaches and creme.  At one point, I made some place mats for my sister using 8-shaft hounds tooth in peaches and creme cotton, and yes, they were really cool.... but... they were also really loose because the floats were so long and you kind of have to mold them into place on the table and hope they will stay.


Monday, December 16, 2013

A few quickie Christmas scarves

I decided at the last minute to make scarves for a few people at school.  It started with wanting to make my two principals scarves for Christmas in our lovely new school colors!  Not only did they change our school mascot and colors this year, but we also have two new principals.  Our school has gone through a lot of changes!

Now our colors are blue and orange.  These scarves will be SOOO loud!


Who wouldn't want to wear a scarf with the same colors as a box of Mac N'Cheese? 
  

 Unfortunately, I really wanted a lighter blue instead of navy because in low light situations, this is going to appear very Halloween-ish.  But it's all the store had this day, and it still looks good in good lighting! 


Best of all, I only spend $3 on each principal this year!  What a lovely gift for so cheap!

Here's the 2nd one.  I used opposite colors so they could tell them apart and also so I wouldn't run out of the main color.


And both of them together:


I also promised my team of teachers at school that I would make a scarf for the janitor's "winter survival" basket.  We're putting other winter items in the basket, like a mug, coffee and tea, and some gift cards.  I'm sure she'll love it!  She's the hardest working janitor I have ever seen.  My room is so squeaky clean all the time!


I love color, so I tried to make it as colorful as I could!


My hubby's cousin contacted me and wanted me to make a list minute scarf for Christmas for his wife.  I said sure!  He sent me this pic of her coat to match.  He said a scarf with zigzags in light blue and lime green would be perfect!  I agree!


I think they will look fabulous together... the coat and this scarf.  I also think Chris and Rhonda will look fabulous this winter in their matching scarves together!  Chris' scarf was the one I did this summer and looked like this:


It zigs and zags a little differently than Rhonda's... but it's the same zigzag pattern done in Navy and shades of green.


And one more zigzag in some Seattle Sea Hawk colors!


Now I can rest easier knowing I have helped keep several people extra warm this Christmas season!

Wednesday, April 10, 2013

Plied


I couldn't wait to get these plied!  They look just like I wanted them to look! 


The only hard thing about it was that the plies broke more often than I wanted them to, but I don't think it will be too big of a problem.  I can work around what yarn I do have.  I just tied the plies back together and kept on going.  When I do the warp board, I can cut out the parts that have knots and also when I'm weaving, if there are too many knots in the weft, I can make it work by cutting it and starting over again.  I don't think it will happen too often though... it just felt as though the breaks happened more often than I wanted it to while I was plying them!

Now all I need to do is make some navy in 2-ply and 3-ply, and I should be good to go!  I might just do 3-ply navy... but something tells me that I might want the 2-ply to even things out a bit.

Monday, March 18, 2013

Dissection


I think I finally have dissected enough yarn to ply some together to make the colorful yarn for my cousin's scarf.  I need to turn half of this into a 3-ply with all the colors and the other half needs to be a 2-ply green and pink.


After that, I think I might need to change the navy to corresponding sizes of 2-ply and 3-ply also.  Taking the yarn apart and putting ti back together really isn't entirely all that difficult, although sometimes it does tangle a little bit... mostly I am enjoying the challenge of this project!

Thursday, February 7, 2013

Salvaging the worst invention. Ever.

 I saved it by
 

quilting it


with cat fabric on the back.

It's not the best looking rug, but it's very soft, thick, and feels like a terry cloth towel.


To me it's kind of ugly and not really what I had in mind, however it's soft and durable and it will do a good job. 

Plus, I saved its life!

Tuesday, February 5, 2013

Epic Huge

These are HUGE!
Like, Epic Huge!


And just as predicted, so are the floats.


But I like the pattern enough to stick it out!


Perhaps a quilted rug is on the horizon?  I'll have to see how this washes up!

Sunday, February 3, 2013

Larger than Life Hounds Tooth

So I got this random idea while I was measuring out the warp for my loom... what if I tried to make even bigger hounds tooth... I mean, this is worsted weight cotton and it's going to be about the size of the hounds tooth on the acrylic scarves, so what if I doubled it?

My idea came from this picture on Pinterest:


I was looking online to see if Peaches & Creme still make the double worsted weight cones, but I did not see them.  I emailed them, and the company has since sold and that is one of the discontinued lines.  In their email, they suggested doubling the worsted weight, so I'm going to thread my loom as 1-1-2-2-3-3-4-4-5-5-6-6-7-7-8-8 and weave it the same way.  This is just an experiment, so who knows!  I may terribly regret this decision, or it may be the newest, latest, and greatest thing!


The only problem is the floats will be quite large... but you don't really know if it's going to work or not unless you try, right?!  Maybe it won't make the greatest floor mat, maybe our toes will get caught and we'll fall and hit our heads on the sink... and maybe not.  Doc Brown in the movie Back to the Future had a lot of luck when he hit his head on the toilet.  That's when he invented the flux capacitor... and you know life changed ever since that invention!  You just never know... I could also sew them down on my sewing machine... almost like when a quilt is "quilted".  There are options that I'm willing to explore later down the road, if needed.

Here are the stats:
  • 2 yard warp
  • 14-15 wraps per inch of worsted weight Peaches & Creme cotton
  • Sett is 9 on #10 reed (I just threaded 8 and skipped a space)
  • 26" across on loom
  • 234 ends total, so it will be 14 hounds tooth across
  • 468 yards for each color in the warp, and each cone has 106 yards
  • 56 times around the warp board for each color, so I did it in sections of 2, or 28 each


I love these stripes in the blue!  The official name is Hippi.


So in this warp, there will be 7 hounds tooth of each color... 

I'm soooo super excited to try this!!!!
The loom is ready to thread... and it should thread up quickly!

Saturday, February 2, 2013

Houndstooth in Cotton

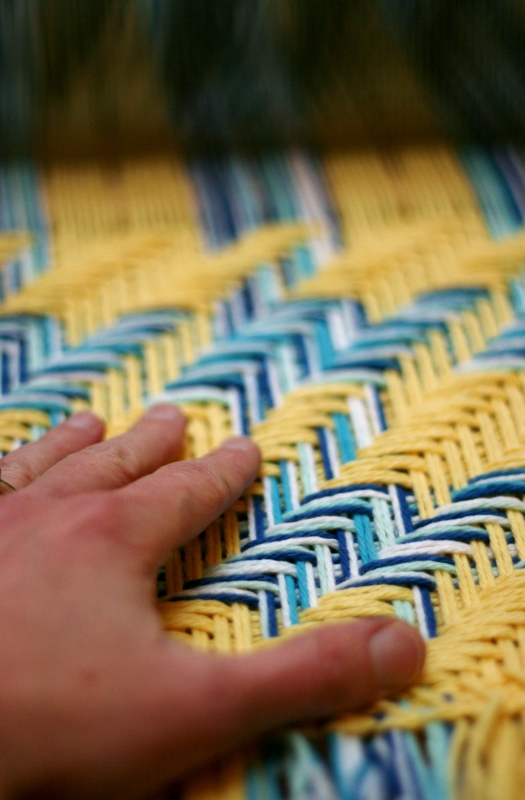
While shopping at Wal-mart a few months ago, I found that they carry Peaches & Creme cotton.  I was overjoyed!!  I bought this lovely cone of buttercup yellow and this other cone of wonderful shades of aquas and blues!


I have been sitting on them in my stash for a month or two, not sure if I want a bathmat or some new placemats.


I knew one thing is for sure... it will be woven into houndstooth!  Maybe I'll go for the bathmat... I have another cone of white and some smaller balls that I can use for some placemats if it looks suitable for such.

Sunday, January 20, 2013

My Cousin's Hat-matching Scarf update

Remember the woven hat with the hounds tooth that I'm trying to match for my cousin and weave her a scarf?  She picked out some much better colors AND dropped them off when she visited last month!  So, I decided to do a sample and it's looking really good...  Now, keep in mind this is the project where I have to dissect the yarn into individual plies, spin it a little bit, and then put it all back together again!  :-)  And it's working!!


I noticed in the hat that the warp will need to be one of the combinations and the weft will be the other one. As for the navy blue yarn, I'm not sure how I want to work it.  I can't leave it as 4-ply, but should I mix it's size, also?  Maybe some 3-ply going one way and some 2-ply going the other?  Maybe make the amount of plies opposite of the colorful ones to balance it better?  Or make it all 2 or 3-ply yarn, throughout the whole thing?  I think the idea I like the best is to make it the same size as the warp, and then a different size that is the same size as the weft.  For example, if I use 2-ply pink and green in the warp, I will use 2-ply navy also in the warp.  And then that means the 3-ply pink, green, and cream will be the weft, so I use 3-ply navy for the weft.

I'm not sure yet...  it's all one really huge experiment!

Monday, December 17, 2012

Another one done!


I'm almost caught up with all that I need to get done!

Sunday, December 16, 2012

Free Pattern: How to make a Polyester Houndstooth Scarf

I have received two last minute orders for Christmas scarves from friends!  So I decided to make a tutorial for you so you can make your own.  They have been very popular this year! 

Measure out 2.5 yard warps in each color.  There will be one set of 17 threads on the warp and the other set will have 12 threads.  Today, the aqua has 17 on the warp board, or 34 total.  This accounts for 4 stripes of 8 threads each, or 32 threads, plus 2 float threads, one on each side.  The black was the less number today, and it went around 12 times, so we have 24 threads, or 3 stripes of 8 each.


I put the color with more on first, and then the 2nd color on after it.  I am using a #8 reed with 1 thread per dent, so it has an e.p.i. of 8.


Thread the heddles 1-2-3-4-5-6-7-8 with each color, making sure to start with 1 float and end with 1 float thread.


Wind on the warp.


Tie on the warp...


...and make sure the treadles are tied up as 1-2-3-4, 2-3-4-5, 3-4-5-6, 4-5-6-7, 5-6-7-8, 6-7-8-1, 7-8-1-2, 8-1-2-3.


Weave with the aqua first, or whatever color is on the outside.  Start with 4 rows of plain weave.  Then press treadles in order 1-8 with the one color.  Make a nice little hemstitch to hold the yarn together.

Do the 2nd color with the treadles in order of 1-8.  Then back to the first, etc.  While weaving, make sure not to beat the yarn in too hard.  Just place it into place, or else you will pretty much have a funny looking skinny rug!

When you get to the end, do the outside color last, and then 4 rows of plain weave.  Add another little hemstitch to hold it in.


Cut it off the loom, make sure the fringe is all the same length.  Twist it together, and viola!  You have a polyester scarf!!