Friday, December 21, 2012

My very first gamp

Believe it or not, I have never made a color gamp before.  The bookmarks were as close to a color gamp as I've ever been!  I feel like I have had a nontraditional start to my weaving career by teaching myself and learning through books, so that is probably why I skipped the gamp stage.  However, I really want to do a gamp of some sort, so I decided to do one while learning about crackle weave.


We just need "kitty approval" before we begin!  


Approved!

Thursday, December 20, 2012

Where to go from here?

I have been at a funny crossroads of sort lately, not sure what I want to do, not sure where I want to go.  I have been so overly focused for the last few months (since about May), that I feel a little bit lost and out of sorts lately, especially with all the sadness that has happened in the last week.

So... I turned to my personal library.  I decided to start learning about crackle weave.  At first when I started reading about it, it seemed SO confusing!!  I just didn't seem to understand anything!  But the more I play around with it on some weaving software, the better I am understanding it.

By the way, a friend on Ravlery showed me this site by pixeLoom.  It has a free download to try out their software before you buy it.  And the free sample is so very comprehensive!  You can do everything, except save and print.  I am really enjoying just playing around and getting to know the software.


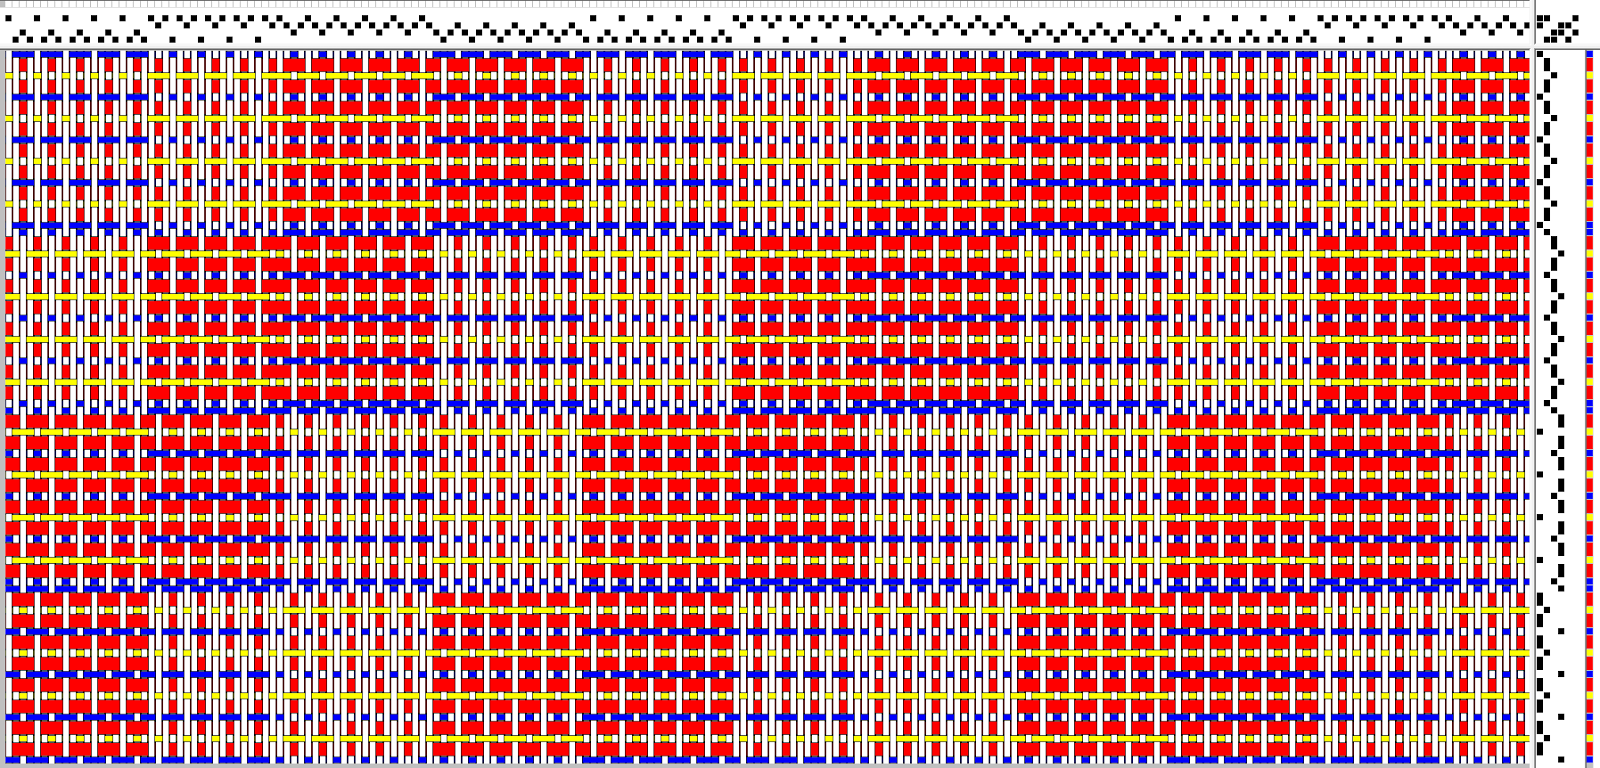
Here is my first attempt at traditional crackle weave using the software:


What I also like about this software is that you can treadle 2 or more treadles at once, as for skeleton tie-ups.  I didn't do that here, but it would have been so super useful when I was working on the snowmen project!  However, you can also change the size of threads on this one, like for the pattern weft, and that is a very handy tool to have!


Here is an attempt at crackle weave, treadled as overshot:


What I would like to do is just play on my loom for a bit, trying out all the different ways to treadle crackle.  I know nothing about it, so it's kind of intimidating, yet also very intriguing!  I am thinking of starting out with a gamp of some sort, playing around with color and treadlings.


Here is crackle treadled as  paired summer and winter:


This is just way too cool!  Now, I just need to save up my money so I can unlock the saving and printing features.... because you can never trust technology!  Even though I am not closing the program on my computer, if the computer were to crash, I would lose all my work because I can't save it yet.


PS. Too colorful?

Wednesday, December 19, 2012

Twill Stripes! & Lots of Luck for me? For you?


Yesterday seemed to be my lucky day because I found a $20 bill on the ground.  Part of me wanted to keep it, but part of me wondered who it belonged to.  I found it in a bathroom shared by only a few people, so I had a chance of finding the owner... who probably would have ended up blaming some innocent student of stealing it, if I hadn't returned it!  Lesson reminder for today: do unto others as you would have them do unto you.

Tuesday, December 18, 2012

And now, the rest of the warp.

When I was in middle school and high school, I had the opportunity to carpool with my dad everyday to school.  It allowed us some great father/daughter bonding moments, lots of time to talk, and just make jokes!  One of our favorite things to listen to at 4:30 on the radio was Paul Harvey's The Rest of the Story.  I loved Paul Harvey's voice, the way he would say "Huskkkk-Varhna" for one of the advertisements, I think it was for a chainsaw!  I also loved how the story would be end with a bang, when you would find that this humble little story belongs to someone very famous and seen as very successful.  Good old Paul Harvey!  My title today reminds me of one of his segments: And now, the rest of the warp...

Back in September on Labor day weekend, I started a project on my 4-shaft loom.  I have had it sitting with the end-bits on it for quite some time!  It has looked like this for 3 months:


There was enough here to make another project like the original project, but the original project was just so much work, so I decided to just weave this off as a dishtowel.

This is a combination I came across when I was weaving the bookmarks earlier this summer, so I saved a snippet to experiment with later:


I think this will make a neat little dishtowel, AND it will be great to use up this warp!


Halleluiah!  I'm almost all caught up!

And guess what?  I got fan mail!  YES!  The REAL DEAL!

Check this out:


Isn't this adorable?  It's a little tiny envelope ornament with a little overshot tree stamp!!  It was made by Amy in Washington state, not far from where my husband grew up.  She's a true blue, through and through weave-away blog follower!  She also has a blog, and it's located at fromoneshoretoanother.blogspot.com!  I'm excited to have another blog to follow and explore!

Monday, December 17, 2012

Another one done!


I'm almost caught up with all that I need to get done!

Sunday, December 16, 2012

Free Pattern: How to make a Polyester Houndstooth Scarf

I have received two last minute orders for Christmas scarves from friends!  So I decided to make a tutorial for you so you can make your own.  They have been very popular this year! 

Measure out 2.5 yard warps in each color.  There will be one set of 17 threads on the warp and the other set will have 12 threads.  Today, the aqua has 17 on the warp board, or 34 total.  This accounts for 4 stripes of 8 threads each, or 32 threads, plus 2 float threads, one on each side.  The black was the less number today, and it went around 12 times, so we have 24 threads, or 3 stripes of 8 each.


I put the color with more on first, and then the 2nd color on after it.  I am using a #8 reed with 1 thread per dent, so it has an e.p.i. of 8.


Thread the heddles 1-2-3-4-5-6-7-8 with each color, making sure to start with 1 float and end with 1 float thread.


Wind on the warp.


Tie on the warp...


...and make sure the treadles are tied up as 1-2-3-4, 2-3-4-5, 3-4-5-6, 4-5-6-7, 5-6-7-8, 6-7-8-1, 7-8-1-2, 8-1-2-3.


Weave with the aqua first, or whatever color is on the outside.  Start with 4 rows of plain weave.  Then press treadles in order 1-8 with the one color.  Make a nice little hemstitch to hold the yarn together.

Do the 2nd color with the treadles in order of 1-8.  Then back to the first, etc.  While weaving, make sure not to beat the yarn in too hard.  Just place it into place, or else you will pretty much have a funny looking skinny rug!

When you get to the end, do the outside color last, and then 4 rows of plain weave.  Add another little hemstitch to hold it in.


Cut it off the loom, make sure the fringe is all the same length.  Twist it together, and viola!  You have a polyester scarf!!


Saturday, December 15, 2012

Friday, December 14, 2012

How to make an ornament

My first few snowmen ornaments were not so great!  The snowman fabric stretched pretty badly, and I couldn't remember how I did it last year until I messed with it a bit.  So, here are my instructions to help you out and to help me out in December 2013!


First, cut all of the materials.  I measured out the snowman motif and decided a 2.5"x3.5" rectangle was perfect!


Next, make a sandwich with the whole deal by putting on the backing (right side facing out), the batting, and the snowman on top (also right side facing out).  Sew on the top edge (short edge) with a serger.


Next, sew down one side (long side) with the snowman motif facing up.


Sew down the other long side, this time the whole thing needs to be flipped upside-down while sewing.  This helps to flatten the snowman out.  The handwoven fabric tends to stretch much more than the store-bought backing does.


Make sure as you get to the end, the motif is laying flat and it's not all wrinkly as it goes through.


Last, sew up a short edge, also upside-down.  This helps the fabric not stretch out of control. Sometimes it helps to cut this edge straight before serging, but you don't have to.  Just be sure you capture all the layers of fabric in it!


This is what it should look like when you first take it off.  Notice it lays pretty flat!  Not bad!


Cut off the edges carefully.  Just stretch out the serged thread and snip it off.  


Find a helper to help thread the hangers!  This year, Brian helped with that!  He's such a good helper!


 And presto, all 102 were done in a matter a few hours!


I love making some handwoven thing to include in our Christmas letters.  My first year weaving (2010) I made these snowflake cards and glued the motif onto the front of the card:


Then people asked, "Why did you do that?  I would love it as an ornament!"  


So, last year (2011) I made these lace tree ornaments:


This year are the snowmen!  Next year, maybe the sheep?  Or Santa Claus?  Or a Reindeer?  We'll have to see!

Now, to write up the letter, pick out and update all the addresses, and send them off to their new homes!  Whew!  Christmas time is such a busy time of year!

Thursday, December 13, 2012

Handtowel

 The snowmen are all washed up and the towel turned out so soft!!  It's actually really cute and cheerful!  Now I just need to decide if I want it in the bathroom...


 ... or the kitchen!


It occurred to me yesterday that during my boredom with this warp, I could have used some of the other designs in the same pattern.  However, I kind of want to save them for in the future.  I mean, it's at least 4 or 5 years worth of designs before I have to figure out a new Christmas ornament design!

These snowmen ended up turning out really cute, and I'm feeling refreshed now that they are done.  All I have to do now is sew them into ornaments and send them away for other families to enjoy!

Wednesday, December 12, 2012

Bonus dishtowel

Alas, I finally took a day to just power through the snowman warp by making a plain weave dishtowel.  I made one row of snowmen and the rest is plain weave.  If you remember, the back of this weave looks a little funny because it's all the opposites (since it's summer and winter) so I decided to put the snowmen on one side.  It makes it less likely to see the other not-as-pretty side!


My edges were so much better on this towel because I knew that I couldn't just sew them off and cut and hide my sloppiness!  So I definitely took my time to make them look gorgeous! 


Now that I think about it, I really did warp enough for 100 snowmen and a dishtowel, so I guess I just unintentionally followed my original plans!

But nothing beats having an empty loom right now!  I've felt so much more inspired by the looks of the empty loom than I have in a few weeks.  I'm glad the weaving of the snowmen is done, now I just need to sew them.  In fact, here is my order of projects, and only the first two are time-sensitive:

1.  Sew up snowmen ornaments.
2. Make 2 more houndstooth scarves for friends who purchased them as x-mas gifts.
3.  Start AND finish my cousin's scarf to match her hat.
4.   Weave off the remainder of my 4-shaft loom.  It is a twill pattern, so I'm just going to make some colorful dishtowels.
5.  Make some curtains for my front and back door windows so creepy tall people can't spy on us.
6.  Work on something from my own head.... I already have a pattern picked out!