Monday, October 31, 2011

Thanksgiving 2010 placemats

I love going back and looking at my old weaving projects.  I actually made these placemats a year ago this month, in 2010.  It was one of the first major projects I made on my floor loom!  I was so proud of these, and yet I feel like now I have come such a long way since I made these this time last year.  I really enjoyed this project though, and it made 7 placemats!  I used an 8/4 cotton carpet yarn, so they turned out so super thick!  We have been using them all the time in the last year!


I can't wait to see what the next year brings in my weaving adventures!


These are the two treadling patterns I used for the placemats.  It's called Jewell and I got the pattern from page 45 in A Handweaver's Pattern Book.


Saturday, October 29, 2011

Zen towels are done!!

And I love them!!!  Here are some fresh from the loom pictures:


After washing and cutting apart, which is one of my favorite steps!!


I find these colors both refreshing and energizing! 

Friday, October 28, 2011

Favorite things

I feel like sharing some of my favorite things with you today!  It would be fun if you all did the same on your blogs so we can get to know each other better!  I'm sure you can guess a lot of these things about be, but here they are anyway:


Favorite weaves:
1.  Summer and winter
2.  Huck
3.  Overshot
4.  Twill


Favorite materials/sizes:
1.  Cotton 12/2 & 8/2
2.  Wool sport weight


Favorite projects: Dishtowels


Favorite books:

4-shaft
Bertha Gray Hayes Miniature Overshot Patterns
Anne Dixon's The Handweavers Pattern Directory
Marguerite Porter Davison's A Handweaver's Pattern book

8-shaft
8-shafts, a place to begin
A Weaver's book of 8-shaft patterns
The Gartner manuscripts
Marguerite Porter Davison's A Handweaver's Source book

both: Margaret B. Windeknecht's Color and weave


Favorite ice cream: Death by Chocolate (Made by Kroger) smothered in genuine Hershey's chocolate syrup

Favorite colors: blue and green

Favorite food: my Grandma's meatball recipe

Wednesday, October 26, 2011

Christmas card ideas

I'm already thinking about Christmas cards.  Don't be too shocked, I think I already had mine done this time last year!  So technically, I am already late!  I have been floating some new ideas around for this year, but can't really settle on one thing just yet.  Let's start with last year's card:


I wove little patterns from Bertha Gray Hayes.  They looked like snowflakes!  They turned out cute, and I just sewed the edges and cut them apart.  Then I glued them onto the cards.  Two problems with this though, first, the card stock is kind of expensive.  And second, people didn't know what to do with it.  I told them they didn't have to do anything with it but enjoy it.  But people wanted to do something with the woven part.  They were so confused, and I didn't mean to confuse them!  I thought of it like scrap booking, you know, gluing decorations all over paper.  But I'm not a "scrap booker" and maybe that is where the problem lies.

So then later in the spring I came up with the idea of bookmark cards.  On my warp, I made spaces between the bookmarks and I didn't like how the edges didn't seem packed in.  They almost wanted to just lazily spread apart too much.  It always felt like I was loosing the ends. 


So I sewed all around them on my sewing machine, and then I thought to myself, "Why didn't I just make a solid piece of fabric and then sew rectangles and then cut it all apart?"  I think that would be better.


Then after I made the bookmarks, I stapled them onto the card so they could easily be removed.  This works out great, except the cardstock is kind of expensive AND you can see the staples from inside the card.  But at least you get something useful in the end!  


Another problem with this idea is it feels like I've "been there, done that" sort of a thing, because I just made these in April and because I made so many, I sent letters to all my friends already and even gave some away by the dozen as gifts....  so it's not all that totally new anymore even though it started as an experiment for my 2011 Christmas cards!


Then while driving home from school one day last month I thought of this cute idea:


This is actually a little card I sent a friend this week and all I did was take a sample and sew the loose edges with very tight stitches on my sewing machine.  Then I sewed with huge stitches all the way around it.  It's just a quad-fold card printed from the computer on regular computer paper.  The envelopes are really cheap at the office supply place.  So the cards themselves cost next to nothing!  AND the stitches that hold the weaving in place are sandwiched between the folds of the paper!


This solves the expensive card stock problem, but now the only problem that still remains is people will want to do something with the weaving afterwards.  So I'm still thinking of maybe ornaments with really thin batting between it.  I could do a little weaving and then some thin batting, and then some Christmas fabric on the back with a little loop of thread to hang it up on the tree. 

Here are my weaving project plans from the Sept/Oct 1995 Handwoven magazine.  It is the Huck lace ornament designed by Susan Leschke from Palmyra, Virginia, page 70 & 92:


Questions for my blog readers:

What are some of your weaving plans for the holidays? 
And when do you typically get started with them?


Monday, October 24, 2011

The Rustic Diagnal Striped Scarf


After a few weeks of spinning 2-ply yarn, I finally feel like I have enough to weave with!  But I also feel like I need to do lots of sampling because I'm not sure how it's going to respond to the loom.  I have woven with handspun yarn before, but it was on my rigid heddle loom.  This time, I am going to use my floor loom and I'm so excited!  I almost feel like a new weaver.


I decided to stick to very simple designs to begin with for 2 reasons: 1) I have mainly turned into a cotton weaver and this is wool and 2) this is my handspun and it might behave differently than other commercially produced wool yarns that I've used in the past.


So when I first sat down to draw out my plans, I decided on an M&O design. But I've only woven M&O's once before, with cotton... so I decided to maybe save that one for later and do a very simple 2/2 twill.


My handspun yarn had a w.p.i. of 18, and since I was going to do twill I multiplied it by .66 to get a e.p.i. of 12.  I don't have a #12 reed, so I threaded my #8 with 1-2.  The wool really wanted to stick in the reed while I was winding it onto the back beam so perhaps in the future I will try to thread a read 1 strand per dent.  I only wanted a 6" scarf to practice on, so I counted out 36 threads on the warp board at 2.5 yards. 


I warped my 4-shaft loom 1-2-3-4 and did the usual twill tie-up of pedals 1-2, 2-3, 3-4, & 1-4.  Then I simply treadled 1-2-3-4 over and over again.  So far it's been very interesting to see the pattern emerge and the characteristics it is taking due to the handspun wool yarn.  I can't beat it too hard, I kind of have to gently push it into place.


So far I like it!  It has some neat bumps and imperfections that you can't get in commercially produced wool yarn.  It's neat to see it being incorporated into the design!  It almost become a new design element!


And it cost next to nothing because it is made completely from scratch!
That feels good!


I could have sat and done this all in one sitting, that's how fast it was weaving up.  But instead, I decided to take my time and enjoy the process!

Plus, those apples just keep coming off the trees, and those have been taking a lot of my time lately! 

 I love the way this wool wove up.  It looks so cool, all the little blobs that appear in the weaving due to the imperfections in my handspun yarn.  It gives it a real rustic look.


 And about the natural wool colors... I love them! 


 It's not the softest wool ever, but with a collared jacket, it should be one of the warmest scarves ever!


I made the fringe SUPER long!!  It's going to flow so nicely in the chilly winter wind!


It's hard to think about how nice this will be on a cold day, because our temps were around 80 when I was weaving it!  But it will be cold one of these days, and someone in the family will get a chance to enjoy it!


Keep those shuttles and wheels amovin'!

Saturday, October 22, 2011

Confessions of a balding cat

 I don't know if you've noticed lately, but I haven't been taking my cat pictures.  And there's a reason...


Poor Mr. Zip is going bald.  It's so unexplainable and has happened so fast.


This picture from April shows he had a fully body of soft, fluffy fur.  Then this summer it started disappearing for no reason.


But now, he is so mysteriously bald.


We took him to the vet in August, and they suggested a food allergy.  So we changed foods.  It started to go away, and he started to grow fluff back, until a few weeks ago.  He really starting losing it fast, and would not stop licking.  So we took him to the vet again and they've run some tests.  It's negative on the mites and fleas, but we're still waiting on some of the cultured results from poor Mr. Zip.

Poor guy, he looks so homeless and mangy.  Hopefully we can get this problem "licked" soon.  He was such a pretty kitty!

Thursday, October 20, 2011

Fixing the Color in your pictures

I've noticed a lot of comments lately from other weavers who are frustrated with the way their computer changes the color of their weaving projects.  Did you know that there are ways to fix it? I am just using the Windows Live Photo Gallery that came with our computer, and it's far from a fancy program at all.  There are so many different free and cheap programs out there, all you need to do is open your photo in a program that allows you to mess with some of the contrast, hue, tint areas. 

Sometimes our camera's lens gets "tricked" if the lighting is just wrong, and it can completely change the shade of the picture or the picture could be too dark, etc.  Take this file photo from last week as an example:


This picture is not only too dark, but the goldeny yellow is not coming through too well. 


There are a lot of photo software programs out there that are simple and easy to use.  In mine, I just found the area to change the brightness, contrast, shadows, highlights, hue, tint, and saturation.  In these areas, you can bring back the true colors of your weaving.  Don't be afraid to try them out and make mistakes along the way.  You can always hit the undo button if you don't like what you've done!  I like to play with a 2nd copy of the picture, and never touch the original. 


So by playing around with some of these tools, I have made the picture more honestly reflect the original work of art.


I hope this simple tutorial helps give you the courage and confidence to try out your own pictures!  Have fun with it, explore and experiment away!  Don't be afraid to move those buttons in crazy and bizarre ways.  You may like it, and if not, you can always undo your changes!

Wednesday, October 19, 2011

Color wheel

 So I've been pondering my color choices lately for my latest weave and wondering why they look so good together.  I don't know a whole lot about color theory, BUT I have picked up a few things along the way.

I referenced my Color in Spinning book by Deb Menz because it has a great chapter called "Understanding Color Principles most useful to Spinners" and it's all about color combinations, what they are called, and how they work.  Even though this book is aimed at spinners, I feel in a general way it will help me as a weaver.

First, considering my color choices, I think the obvious things working together are the hues, or colors that appear close together on the color wheel.  The purple & blue work together in the same hue to make up the cool colors, likewise the orange, yellow, and pink all work together to make up the warm colors.  Deb Menz says this about warm & cool colors, "Warm and cool colors react different when combined in a design.  The warm colors appear to pop out and come forward and the cool colors seem to recede and stay in the background.  This is because saturated warm colors have high values than saturated cool colors.  To achieve a harmonious composition, it takes a larger portion of cool colors to balance the warm colors."  (pg 33)  And I can both totally see and feel that in my weaving, I tend to put it a lot more blues and purples, and just little bits of pink, orange, a yellow.  The pink kind of seems like it can transition between both the cool and warm colors, it blends and works well with both groups. 

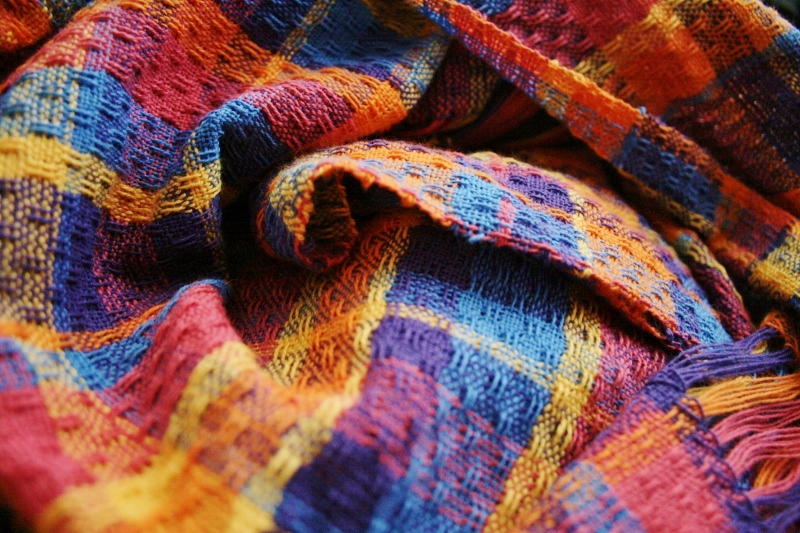
It also happens that these two color families are opposites on the color wheel.  In fact, if you drew a line between all the colors, it would almost end up in a square shape.  That is why I would label these 5 colors as a tetrad harmony.  Deb Menz says this about tetrad harmonies, "A tetrad includes four hue families, two pairs of complements that form a rectangle on the twelve-hue color wheel.  The relationship of complements is being used, but in a slightly different context.  You are working with the complementary relationship and with the relationship between the paris of complements, basically a warm/cool relationship.  Yarns using this harmony are more complex than ones that employ only one relationship at a time."  (pg 42-43) This fits my colors perfectly: they are working as warm and cool but also within themselves, like the purple and blue look so good together, so does the orange, yellow, and pink.  This is so neat!

I found this color wheel that labeled all the secondary colors, or colors you can get when you mix the primary colors together.  Notice how I have 2 families of colors working together, but they are opposite each other.  That is why it works so well.  It kind of forms a square shape,


When I was warping my loom, I saw groups of my colors that looked really good together that I wanted to investigate further.  Like the orange, blue, and yellow were a great combination!  That is split complementary for sure, as well as the purple, blue, and orange.  Also, the pink, purple, and blue were pretty together, and a good analogous combination.  Another analogous combination were the yellow, orange, and pink, and that combination would make for some exciting dishtowels as well.  These colors will be fun to play with a little bit more when I'm done with this project!


I love colorful projects! 


Fun color tool:

Great color wheel for weavers:


Monday, October 17, 2011

Zen weaves

 I have found my new zen doodles... but for weaving.


 Have you ever heard of zen doodles?  This is an example I randomly pulled off of a Google search:


First, let me clear this up.  I didn't draw this really great picture!  In zen doodles, the doodler just draws what they feel where they want to put the design.  I have tried it myself, but mine never really look this good.  And because they don't look this good, they also don't feel this good.


BUT... I think I have discovered my zen doodles in weaving!  I have felt so free with this project idea inspired by my friend Martha.


First you start with a few colors that look good together.


After some quick calculations to decide how big you want your finished piece, you can then randomly choose the amounts to warp on the warp board.


The amount of each color is supposed to be random.  Now's the time to just let go.  Sometimes it was 5 wraps around the warp board, sometimes 2 or 15.  Sometimes I just even asked my husband to pick out a random color and number for me!

May I suggest putting on some creative music for an even more interesting twist....


Then you thread your reed to the correct epi.  Here I am using my typical 12/2 cotton at 20 epi because huck uses a tabby set.


Huck is simply a 4-shaft lace.  I used the pattern in Anne Dixon's 4-shaft pattern book.  In her pattern, it is threaded 1-3-1-3-1 & 2-4-2-4-2.  Then the pedals are hooked up like 1-4, 2-3, 1-3-4, 2-3-4 and treadled with pedals 2-3-2-3-2 & 1-4-1-4-1.  Pedals 1&2 make up a plain weave, and the rest combine to form a great huck lace. I've been doing my color changes at the 1 or 2 pedal marks.  I am not carrying it up the sides, I am just cutting whenever I feel like it and overlapping the weave for a few inches.  But I choose to do it when it's a plain weave so the tails will hold much easier.


It's the random colors that is really making this weave interesting.  Just like Martha, I love seeing how the colors interact with the huck floats.  I feel like a kid again armed with a brand new box of crayons, coloring outside the lines just to see how the waxes mix with each other.... just for fun.  The only rules I have to follow are the those of the lace weave, but everything else is just so feeling based.


It's gorgeous!  It's exciting!  These towels I'm making have the same concept as the 400 lbs of apples we just finished canning... we are saving them for a time during the winter when we want to zip and pep up a dull, gray, cold day. 


So weave your own last little bit of excitement before winter into towels to cheer you up on a [____fill in the blank with your own negative adjective(s) here_____] winter day!