

My appreciation for card/tablet weaving and inkle looms began when I was looking for a cheaper way to weave. My husband had just lost his job and I had woven through my whole stash of yarn in no time at all. For an entire year, I turned to weaving thrift store thread because it was super cheap (and as a bonus, I could take my loom with me wherever I went)! I think a lot of people poke fun at inkle looms because they seemed too simple. In fact, one day at the library a fellow weaver was doing just that when she saw my stack of card weaving books. She said that floor looms are the only way to go and this stuff was just a waste of time. Come to find out, these inkle looms can be very complex! I am so glad that I had the time to learn how to use an inkle loom. It gave me a whole new appreciation for weaving!
About a year ago I got really serious about using labels so I decided to weave my own. I used sewing thread, my inkle loom, and the letters from Linda Hendrickson's card weaving words book called Please Weave A Message.

I think it adds a neat personal touch to a handmade object!

Below I will show you a tutorial using the letter "a" because it's the first letter of my first name.

Before we begin, let's get our supplies in order.
You will need an inkle loom with a shuttle. I am using the Ashford Inklette loom. It's a wonderful invention because I can take it everywhere with me! However, the original card weaving was done without a loom with the woven end was tied around the waist and the other end was tied to a door knob. I find an inkle loom a little easier to use because I can get up and leave it for awhile instead of being tied to it.

A table clamp is very useful to keep it from sliding all over the place! Half way through I actually turned this clamp over so the bar was pointing towards the floor.

You will also need 24 cards or tablets for these letters. If you don't have any, you can make your own using cereal boxes or playing cards. Let's take a closer look:

Start with a measurement of 2.5". You can use whatever size you want, but 2.5" is a good size!

Mark the center. Go all the way from corner to corner.

Align your compass so it goes from the center to the very edge.

Mark a circle and cut out the square card.

Punch holes at the intersections.

Round the edges.

Now that you have 24 cards, we can talk about setting up your loom. Make sure to undo some of the tension in the tension knob so that your warp isn't completely loose and you can tighten it up when you're done.

I am just using sewing thread to make the woven label very small and inexpensive. It's easiest if you have 2 spools of thread for each color, but you can also wind some bobbins on your sewing machine and use those, too. I had to have my husband help me with this one because the green thread was all over the place. The white ones were still. You can also slip them onto your lazy kate to help you out.

In order to thread the cards you need something really long in order to make sure all the holes are aligned and it also helps to get the thread through. I use this thing that I forgot what it's called... something strange like "that darn purple thing" or something like that. I'm sure a long yarn needle would be fine!

Thread the thread through for all 4 colors going the same way, like front to back. Each 2 sides needs the same colors, so like the top holes both need to be the green and the bottom holes need to be the white. It doesn't really matter what you are calling top and bottom right now, just put the thread into neighboring holes.

In this photo, both holes on top have white and both holes on the bottom have green. Just ignore the random marks on my cards, like the numbers and the lines!

Tie your yarn onto your loom. Or you can tape it.
I do this little slip knot that my husband taught me. It's like 1 1/2 knots.
You tie it on like regular, then when you're going to make that second loop for a knot, you don't pull the thread out all the way. That way you can just slip it off later.

Every time you go around your loom, you are going to drop a card off. Make sure it comes off the same side each time (so all top or all bottom, but never both).

So wind, drop... wind, drop... etc. But don't ever forget to drop one off!!!
If you do forget, you will have 4 extra threads that don't do anything but get in the way. You'll have to cut them out later and tie on the ends.

After 24 rounds, it will look somewhat messy when you are done, but don't worry. You can organize it now that you're done! Make each card face the same direction. It doesn't really matter what direction, they just all need to be the same. So what I did was I put both green holes facing up.

Also, don't worry about the twists that get into the threads. They will work themselves out all the way to the end and then when you're all done, it will be time to cut it off. There will always be twists in our warp when you card/tablet weave.

----------------------------------------------------------------------------------------------
EDIT - Additional information on turning every other card

I almost forgot to mention that you need to rotate every other card so the yarn is coming out of the holes in opposite ways. It can either come out "behind" the hole or in "front" of the hole. Here are some picture examples:


After you turn each card, you need to re-align the colors because now they are opposite each other, too! So after you are done turning every other card, go back and put all the green holes facing up.
The reason why you turn each card is because it makes the letters more crisp around the edges. Here are some examples:


----------------------------------------------------------------------------------------------
You are going to need to weave a header. So weave a little bit, you can twist the cards all the way around, or you could practice 2 forward and 2 backward like what we will be using here today.
This shuttle is headed left.

I have to give the cards a turn. Then I come back from left and go right, and squish down the last one on the way.

Now let's talk about the letter patterns. Linda Hendrickson's book Please Weave a Message is super useful. She provides many different types of fonts to weave, a detailed how-to guide, and a tutorial on how to use Microsoft Excel to design your own patterns that look like hers. VERY COOL BOOK!!!

These are my most favorite looking letters, but she also has some calligraphy ones, italic letters, etc.

If you can't afford the book or really wish to get started today, you can find a short tutorial HERE along with patterns for her most basic letters.

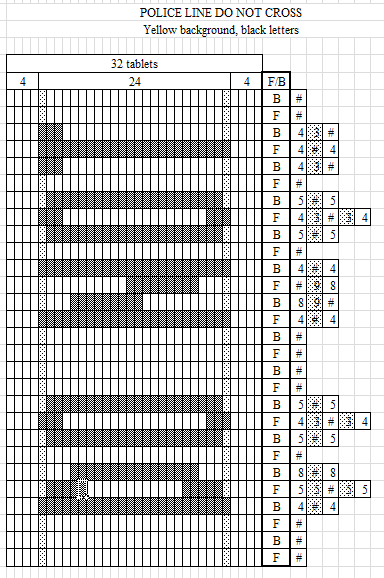
How to read the patterns:
In Linda's patterns, each horizontal box is a card and each vertical box is 2 moves of the cards: it's a twist forward or backwards twice with 2 shots in-between. So take the "a" for example. The bottom line looks like this:

You move from the bottom of the pattern and go up. Each section is 2 moves. Each move could consist of ONE of these:
- Turn the background cards forward (F) once and the letter cards backwards (B) once. Put your shuttle yarn through. Turn the background cards forward (F) a second time and the letter cards backwards (B) a second time. Put your shuttle through. You have now woven 1 row.
OR
2. Turn the background cards backwards (B) once and the letter cards forwards (F) once. Put your shuttle through. Turn the background cards backwards (B) a second time and the letter cards forward (F) a second time. Put your shuttle through. You have now woven 1 row.
If you did #1 the for the first row, do #2 for the second row, and visa versa for the others.
When using Linda's letters, it's easier to slide some cards up and some cards down. I usually put the few cards I'm using for the letters higher than the others. This is because I need to tell them apart. When the background colors are going backwards, the letter colors are going forwards. And visa versa.

Start with both green holes facing towards you.
Row 1:
Twist the background cards forward once, and the letter cards backwards once. Throw your shuttle. Then do the same thing again to complete the first row. Throw your background cards forward once, and the letter cards backwards once.
Row 2:
Twist the background cards backwards ward once, and the letter cards forwards once. Throw your shuttle. Then do the same thing again to complete the first row. Throw your background cards backwards once, and the letter cards forwards once.
You have 4 rows in the letter "a". So you should be moving your cards a total of 8 times to complete the row.
You can see it a little better in this picture. The letter cards are pushed up, the background cards are lower.

I twist the letter cards forward and the background cards backwards. I have to do this twice. Then I can go onto the next square in the pattern.


After following the pattern, I get my letter "a". I used 8 twists total to weave 4 rows of the pattern.

Here is what a project could like in this writing:

Notice I switched background colors and letter colors for different sections. All you have to do it turn the cards the same direction for 2 rows of the design.
There's a lot you can do with card/tablet weaving. The traditional designs look like this:
Notice I switched background colors and letter colors for different sections. All you have to do it turn the cards the same direction for 2 rows of the design.
There's a lot you can do with card/tablet weaving. The traditional designs look like this:

In order to get these designs, you can just go around and around with the cards instead of 2F, 2B. Very cool!
I have also take the time to design some of my own things using Linda's book. In the Microsoft Excel section, she walked me through how to make some of these designs. It's really a great way to make custom gifts for people. I have made so many lanyards with people's names on them and THEY LOVE THEM!!!
This is an example of a lanyard I made for our parole officer at our school. I got the idea from watching NCIS! She loved it!
Page 1

Page 2
Page 3

This lanyard was designed using the logo for our local ambulance company.
Original logo:

My best version:
My pattern:

(I got lazy and didn't fill in any numbers on the right!)
The cool thing about weaving your own labels is that you can say whatever you want to say or weave little icons or motifs of whatever you want in whatever color you want! Oh, the freedom!! Linda Hendrickson also has some other books with motifs and cool things like that, or you could always design your own! This is from Linda's pebble weave book using cards/tablets instead of a backstrap loom:


I don't think you have to have an inkle loom to do card weaving. I know you can tie each end to a belt and not use a loom at all if you want! I would like to try a few experiments of card weaving on my floor loom or my rigid heddle loom. I imagine that you could warp a warp board with the cards and thread, then transition it to your loom, but don't put in the reed or rigid heddle parts. I have not done this yet, but I think it would work! I will have to try it!
I hope you found this tutorial clear and helpful, but if you have any further questions, please don't hesitate to ask them!!! I would love to give you more information! Also, I would love to see your projects!!
I hope you found this tutorial clear and helpful, but if you have any further questions, please don't hesitate to ask them!!! I would love to give you more information! Also, I would love to see your projects!!